Jul 24, 2024 · Homelab
High-Density Short-Depth NAS: Solving a Server Chassis with CAD and 3D Printing
A compact rackmount NAS build shaped by cost, depth, airflow, noise, vibration, power, cabling, and drive-density constraints - and a reminder that CAD plus a 3D printer turns awkward physical problems into solvable ones.
Source
Why this was fun
Some projects are satisfying because they start with a clean idea. This one was satisfying because it didn't.
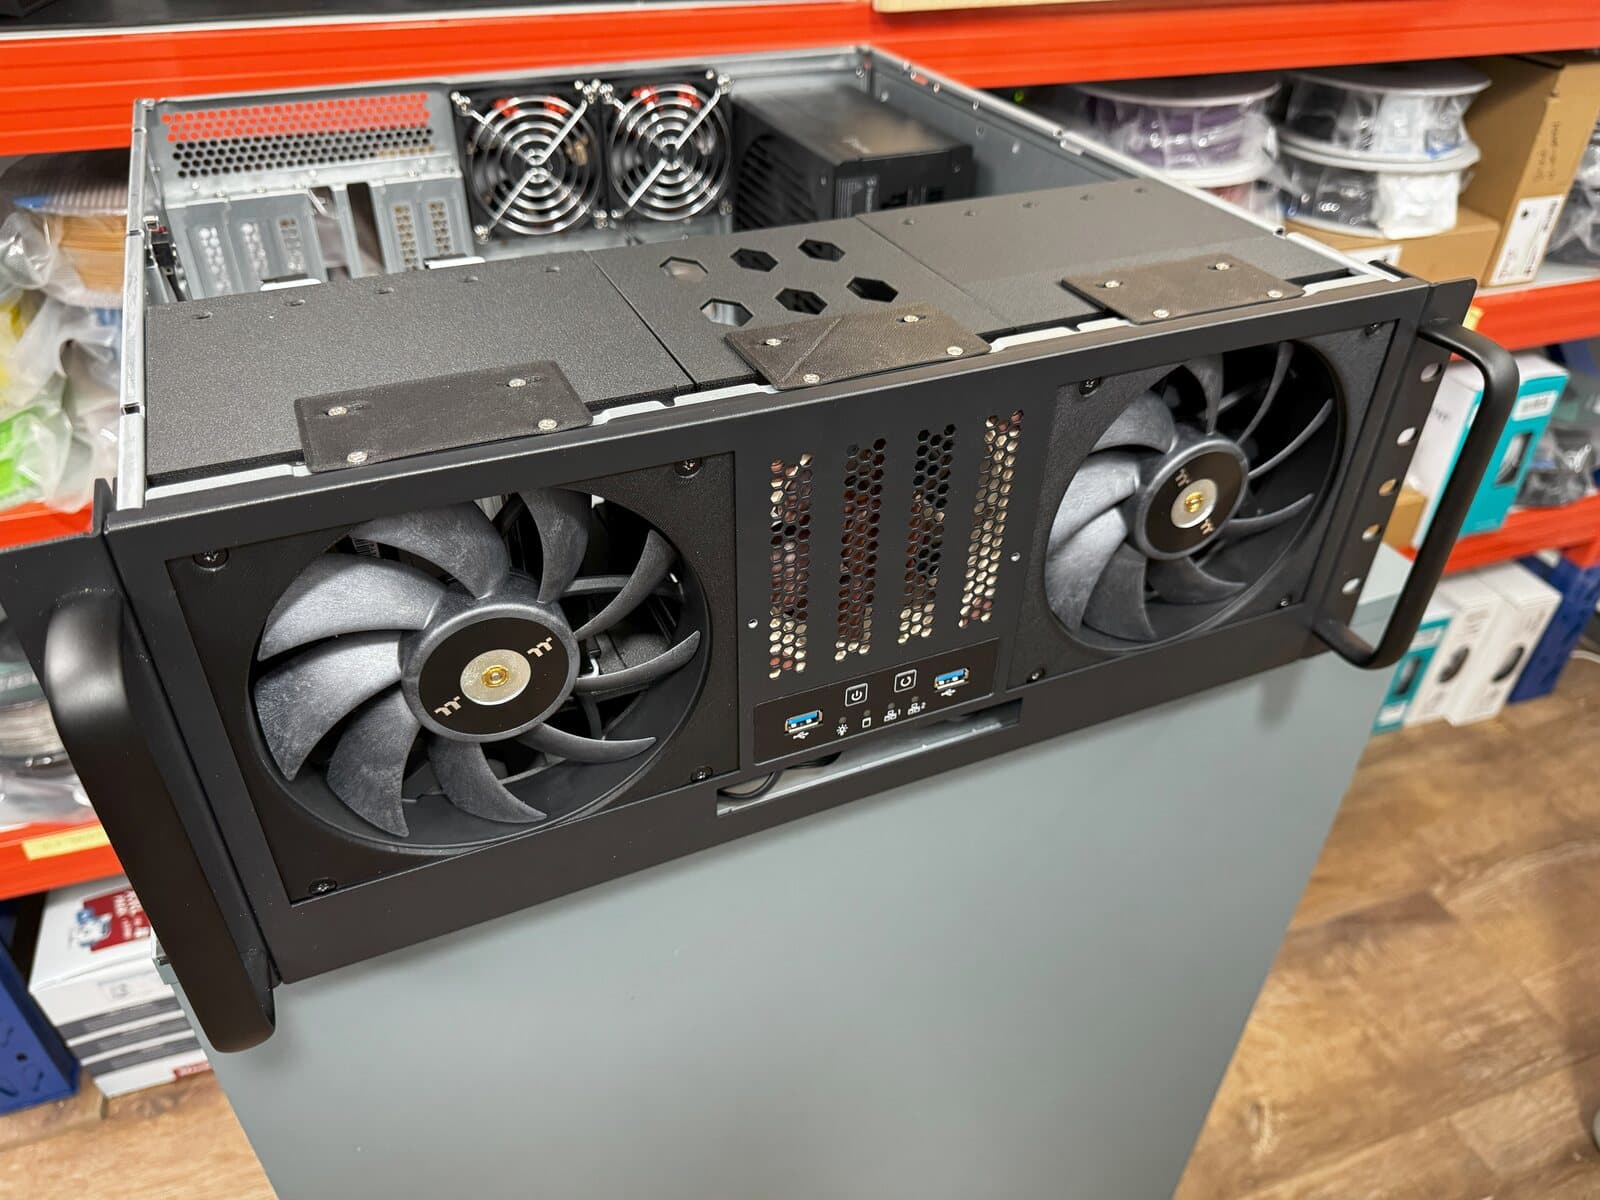
I wanted a rackmount storage server that was affordable, short-depth, reasonably quiet, and dense enough that I wouldn't immediately outgrow it. It also had to work with normal consumer hardware: an ATX motherboard, HBA, dual 10GbE NIC, single-slot GPU, NVMe storage, SATA SSDs, and a lot of 3.5-inch hard drives without cooking them or turning the room into a machine shop.
The obvious commercial answers were either too expensive, too deep, too loud, or not dense enough. The SilverStone RM400 was the best affordable shell I could find, but the stock drive cages weren't a great use of the front volume. They used smaller fans, left density on the table, and didn't give me the vibration damping I wanted for mixed drive sets.
That made the project interesting: the case was close, but not close enough. The real problem became a geometry problem.
I have since built two of these servers and pushed the layout to 18x HDDs. I also remounted the SATA SSDs and fit a single-slot GPU into the servers, so the final layout is denser than the first version but still practical. That's the part I like most about it. It isn't a universal best chassis design. It's a practical answer to a messy pile of constraints.
The constraint stack
The design had to satisfy several things at once:
- Keep the total chassis cost low, roughly around $350 AUD for the build path I chose.
- Stay in a short-depth 4U rackmount form factor.
- Fit an ATX board plus HBA and network card.
- Hold at least 15x 3.5-inch drives, with the design envelope allowing more.
- Keep the 2.5-inch SATA SSDs mounted cleanly without giving up needed expansion slots.
- Improve airflow without making the system needlessly loud.
- Add some vibration damping instead of hard-mounting every drive.
- Leave enough room for a properly sized PSU, power cabling, data cabling, fans, front-panel hardware, and real hands during assembly.
- Support a dual 10GbE network path, with the core network using 2x 10GbE LAG connections for throughput and concurrency.
The final cage design technically fits 20x 3.5-inch HDDs, though the more practical configurations are lower because the bottom positions fight motherboard clearance, cable routing, and direct airflow. In real use, 17x to 18x HDDs is the range that makes the most sense for this chassis and hardware layout.
The side cages use 140mm fans. The center cage uses a 92mm fan because the front buttons and USB ports steal just enough space that a larger center fan doesn't fit. The side cages have about 2mm between drives; the center cage is tighter again at about 1.75mm. Those numbers are small enough that the design stops being conceptual and starts being about whether the parts you drew actually exist in the world you measured.
CAD changed the problem
This is where CAD and 3D printing become more than a way to make plastic objects.
The useful skill isn't just pressing print. It's being able to look at a physical constraint, model the available volume, move mounting points by a few millimetres, test airflow paths, choose where stiffness matters, and decide which tradeoffs are acceptable before committing hours of print time.
For these cages, the model had to carry drive spacing, fan placement, screw access, case mounting points, airflow openings, cable exits, and vibration damping. The cages were printed in Polymaker PA6-CF, with TPU used for the drive rails.
PETG would be technically feasible for many versions of the same idea, and a normal PETG route would be cheaper. I specifically chose not to use it here because heat, long-term durability, and ESD-safe material all mattered in a dense storage chassis. Once ESD-safe PETG was part of the comparison, the cost gap against PA6-CF made it easier to justify the stronger material at the time.
The payoff wasn't just density. With the custom cages and larger fans, the drives ran around 3-4C cooler at full load than they did with the stock cages, staying below 35C in a 22C ambient closet. That's the good kind of result: the custom part solved the physical problem rather than just making the build look custom.
The tradeoffs are real
This isn't a hot-swap storage chassis. It isn't meant to be.
The cost of the density, cooling, and quietness is service convenience. Drives and cables take patience. A front-load tray design with a backplane would be much easier to maintain and less prone to user error. Power handling also matters more than it looks like it will from the outside: this many spinning drives need a properly sized PSU and careful thought about cable runs, especially at spin-up.
The cabling became a minor design challenge in its own right. In a compact chassis, tidy cabling is not just cosmetic. It's how the fans keep doing their job, how connectors stay seated, how the case remains serviceable, and how the system avoids turning every future maintenance task into a puzzle. Custom SATA power cables would still make the layout cleaner, and a full front-panel redesign could move the drives forward slightly and open the door to a cleaner fan and ducting arrangement.
That's a useful design lesson in itself. CAD doesn't remove tradeoffs. It makes them explicit enough that you can choose them.
In this case, I don't touch the drives often, so the maintenance penalty is acceptable. When I do need to work inside the chassis, I plan the time. The design gives me compact, quiet, high-density servers using consumer parts, and the price is that I don't get enterprise-serviceability behaviour from a printed cage system.
The part that carries forward
The bigger value of this project isn't the specific drive cage. It's the reminder that CAD and 3D printing are leverage skills.
Once you can model and manufacture small functional parts, a lot of awkward projects become approachable. Brackets, ducts, cable guides, sensor mounts, storage inserts, repair parts, jigs, adapters, and enclosure changes stop being things you wait for someone else to sell. They become things you can reason about, prototype, test, and improve.
That matters across many of the projects I like: homelab infrastructure, vehicle systems, IoT builds, workshop fixes, and small quality-of-life improvements around the house. The pattern is usually the same. There's a commercial product that almost solves the problem, a physical constraint that makes the obvious answer awkward, and a small custom part that lets the rest of the system work.
This server was a good version of that pattern. The constraints were annoying enough to make the solution interesting, but bounded enough that a weekend of careful modelling and printing could move the whole project forward.
I still have ideas for a v2: cleaner cabling, a front-panel redesign, better ducting, and easier service access. It hasn't been a priority because the two servers have been running flawlessly for years. They just keep chugging along without issue, which is usually the best argument for leaving a working physical system alone.
The satisfying part wasn't making a perfect object. It was making a useful object under pressure from cost, space, heat, noise, vibration, power, cabling, network throughput, and maintenance - and having it work well enough to build twice.